Introduction
In this blog post, we’re going to install Cilium and Linkerd on a Kubernetes cluster.
Cilium is an eBPF-based CNI plugin for Kubernetes. It will let us implement Network Policies on our cluster.
Linkerd is a service mesh for Kubernetes. We will have visibility on the network traffic inside our cluster by using Linkerd Dashboard.
Prerequisites
- docker
- k3d
- kubectl
- helm
- linkerd
Create Kubernetes cluster
We’re going to use k3d in order to setup our test cluster:
k3d cluster create cilium-demo \
--servers 1 \
--agents 1 \
--api-port=6443 \
--k3s-server-arg "--disable=traefik"  \
--k3s-server-arg "--disable-network-policy" \
--k3s-server-arg "--flannel-backend=none" \
--port 8080:80@loadbalancer \
--wait
Here we’ve disabled default CNI and Network Policy plugins built-in to k3d by using these parameters:
--flannel-backend=none and --disable-network-policy
Also, we’ve disabled built-in Traefik ingress controller with --disable=traefik parameter. We will install Nginx later on for handling ingress.
We’ve enabled built-in load balancer with this parameter: --port 8080:80@loadbalancer, which will let us use an ingress controller during our setup.
k3d uses busybox-based images which have /bin/sh as the shell, but not with the /bin/bash. However, Cilium node-init container relies on /bin/bash, hence these containers are failing to run on a cluster built with k3d.
In order to circumvent this problem, we need to mount BPF filesystem to all the nodes manually (relevant bug report: Cilium#14489):
docker exec -it k3d-cilium-demo-agent-0 mount bpffs /sys/fs/bpf -t bpf
docker exec -it k3d-cilium-demo-agent-0 mount --make-shared /sys/fs/bpf
docker exec -it k3d-cilium-demo-server-0 mount bpffs /sys/fs/bpf -t bpf
docker exec -it k3d-cilium-demo-server-0 mount --make-shared /sys/fs/bpf
Install Cilium CNI plugin
# Add Cilium helm repo
helm repo add cilium https://helm.cilium.io/
helm repo update

# Install Cilium helm chart
helm install cilium cilium/cilium --version 1.9.6 \
   --namespace kube-system \
   --set kubeProxyReplacement=partial \
   --set hostServices.enabled=false \
   --set externalIPs.enabled=true \
   --set nodePort.enabled=true \
   --set hostPort.enabled=true \
   --set bpf.masquerade=false \
   --set image.pullPolicy=IfNotPresent \
   --set ipam.mode=kubernetes
Run watch kubectl get po -n kube-system command until all the pods get into Running state.
Afterwards, this command could be used to ensure Cilium starts managing all existing pods too:
kubectl get pods --all-namespaces \
        -o custom-columns=NAMESPACE:.metadata.namespace,NAME:.metadata.name,HOSTNETWORK:.spec.hostNetwork \
        --no-headers=true \
        | grep '<none>' \
        | awk '{print "-n "$1" "$2}' \
        | xargs -L 1 -r kubectl delete pod
Setup test applications
We are going to deploy podinfo and slow_cooker onto our cluster to generate sample network traffic:
# Create the test namespace
kubectl create ns cilium-linkerd
# Install podinfo
kubectl apply -k github.com/stefanprodan/podinfo//kustomize -n cilium-linkerd
Let’s deploy slow_cooker as our client now. slow_cooker will initiate HTTP requests to various API endpoints on podinfo continously:
# client.yaml
apiVersion: apps/v1
kind: Deployment
metadata:
  name: client
  namespace: cilium-linkerd
spec:
  replicas: 1
  selector:
    matchLabels:
      app: client
  template:
    metadata:
      labels:
        app: client
    spec:
      containers:
        - name: client
          image: buoyantio/slow_cooker:1.3.0
          command:
            - "/bin/sh"
          args:
            - "-c"
            - |
              sleep 5
              cat <<EOT >> url_list
              http://podinfo:9898/env
              http://podinfo:9898/version
              http://podinfo:9898/env
              http://podinfo:9898/metrics
              http://podinfo:9898/healthz
              http://podinfo:9898/readyz
              http://podinfo:9898/headers
              EOT
              /slow_cooker/slow_cooker @url_list
          ports:
            - containerPort: 9999
kubectl apply -f client.yaml
Then, we will define our Network Policy rules:
# ingress.yaml
apiVersion: "cilium.io/v2"
kind: CiliumNetworkPolicy
metadata:
  name: "ingress-policy"
  namespace: cilium-linkerd
specs:
  - endpointSelector:
      matchLabels:
        app: podinfo
    ingress:
      - fromEndpoints:
          - matchLabels:
              app: client
        toPorts:
          - ports:
              - port: "9898"
                protocol: TCP
      - fromEndpoints:
          - matchLabels:
              "k8s:io.kubernetes.pod.namespace": linkerd
kubectl apply -f ingress.yaml
This network policy allows pods which have app: podinfo label to accept HTTP requests on port 9898 from the pods which have app: client label. And all requests originating from linkerd namespace will be accepted too.
# egress.yaml
apiVersion: "cilium.io/v2"
kind: CiliumNetworkPolicy
metadata:
  name: "egress-policy"
  namespace: cilium-linkerd
specs:
  - endpointSelector:
      matchLabels:
        app: client
    egress:
      - toEndpoints:
          - matchLabels:
              app: podinfo
  - endpointSelector:
      matchLabels:
        app: client
    egress:
      - toEndpoints:
          - matchLabels:
              "k8s:io.kubernetes.pod.namespace": kube-system
              "k8s:k8s-app": kube-dns
  - endpointSelector:
      matchLabels:
        app: client
    egress:
      - toEndpoints:
          - matchLabels:
              "k8s:io.kubernetes.pod.namespace": "linkerd"
kubectl apply -f egress.yaml
This network policy allows pods which have app: client label to initiate HTTP requests to pods which have app: podinfo label. And all requests to linkerd namespace, or to the kube-dns service will be allowed too.
Setup Linkerd service mesh
Let’s install Linkerd now:
# Install Linkerd CLI on our local machine
curl -sL run.linkerd.io/install | sh

# Validate the cluster to make sure everything is configured correctly
linkerd check --pre

# Install the Linkerd control plane onto the cluster
linkerd install | kubectl apply -f -

# Verify the installation
linkerd check

# Install viz extension
linkerd viz install | kubectl apply -f -

# Verify the installation again
linkerd check

# Inject Linkerd proxy to all the existing pods in our test namespace
kubectl get -n cilium-linkerd deploy -o yaml \
  | linkerd inject - \
  | kubectl apply -f -
Now, we can run this command to see the live capture of all the requests initiated by the pods in the client deployment inside our cluster:
linkerd -n cilium-linkerd viz tap deploy client

Setup Nginx Ingress Controller
At this last step, we are going to setup an ingress controller so we can expose Linkerd Dashboard to the outside world:
# Add ingress-nginx helm repo
helm repo add ingress-nginx https://kubernetes.github.io/ingress-nginx
helm repo update

# Install ingress-nginx helm chart
helm install ingress-nginx ingress-nginx/ingress-nginx
Let’s wait until all the pods get into Running state:
watch kubectl get pods -n default -l app.kubernetes.io/name=ingress-nginx
Once everything is ready, we can expose the dashboard via ingress now:
# nginx.yaml
apiVersion: v1
kind: Secret
type: Opaque
metadata:
  name: web-ingress-auth
  namespace: linkerd-viz
data:
  auth: YWRtaW46JGFwcjEkbjdDdTZnSGwkRTQ3b2dmN0NPOE5SWWpFakJPa1dNLgoK
---
apiVersion: networking.k8s.io/v1
kind: Ingress
metadata:
  name: web-ingress
  namespace: linkerd-viz
  annotations:
    kubernetes.io/ingress.class: "nginx"
    nginx.ingress.kubernetes.io/upstream-vhost: $service_name.$namespace.svc.cluster.local:8084
    nginx.ingress.kubernetes.io/configuration-snippet: |
      proxy_set_header Origin "";
      proxy_hide_header l5d-remote-ip;
      proxy_hide_header l5d-server-id;
    nginx.ingress.kubernetes.io/auth-type: basic
    nginx.ingress.kubernetes.io/auth-secret: web-ingress-auth
    nginx.ingress.kubernetes.io/auth-realm: "Authentication Required"
spec:
  rules:
    - host: "dashboard.example.com"
      http:
        paths:
          - pathType: Prefix
            path: "/"
            backend:
              service:
                name: web
                port:
                  number: 8084
kubectl apply -f nginx.yaml
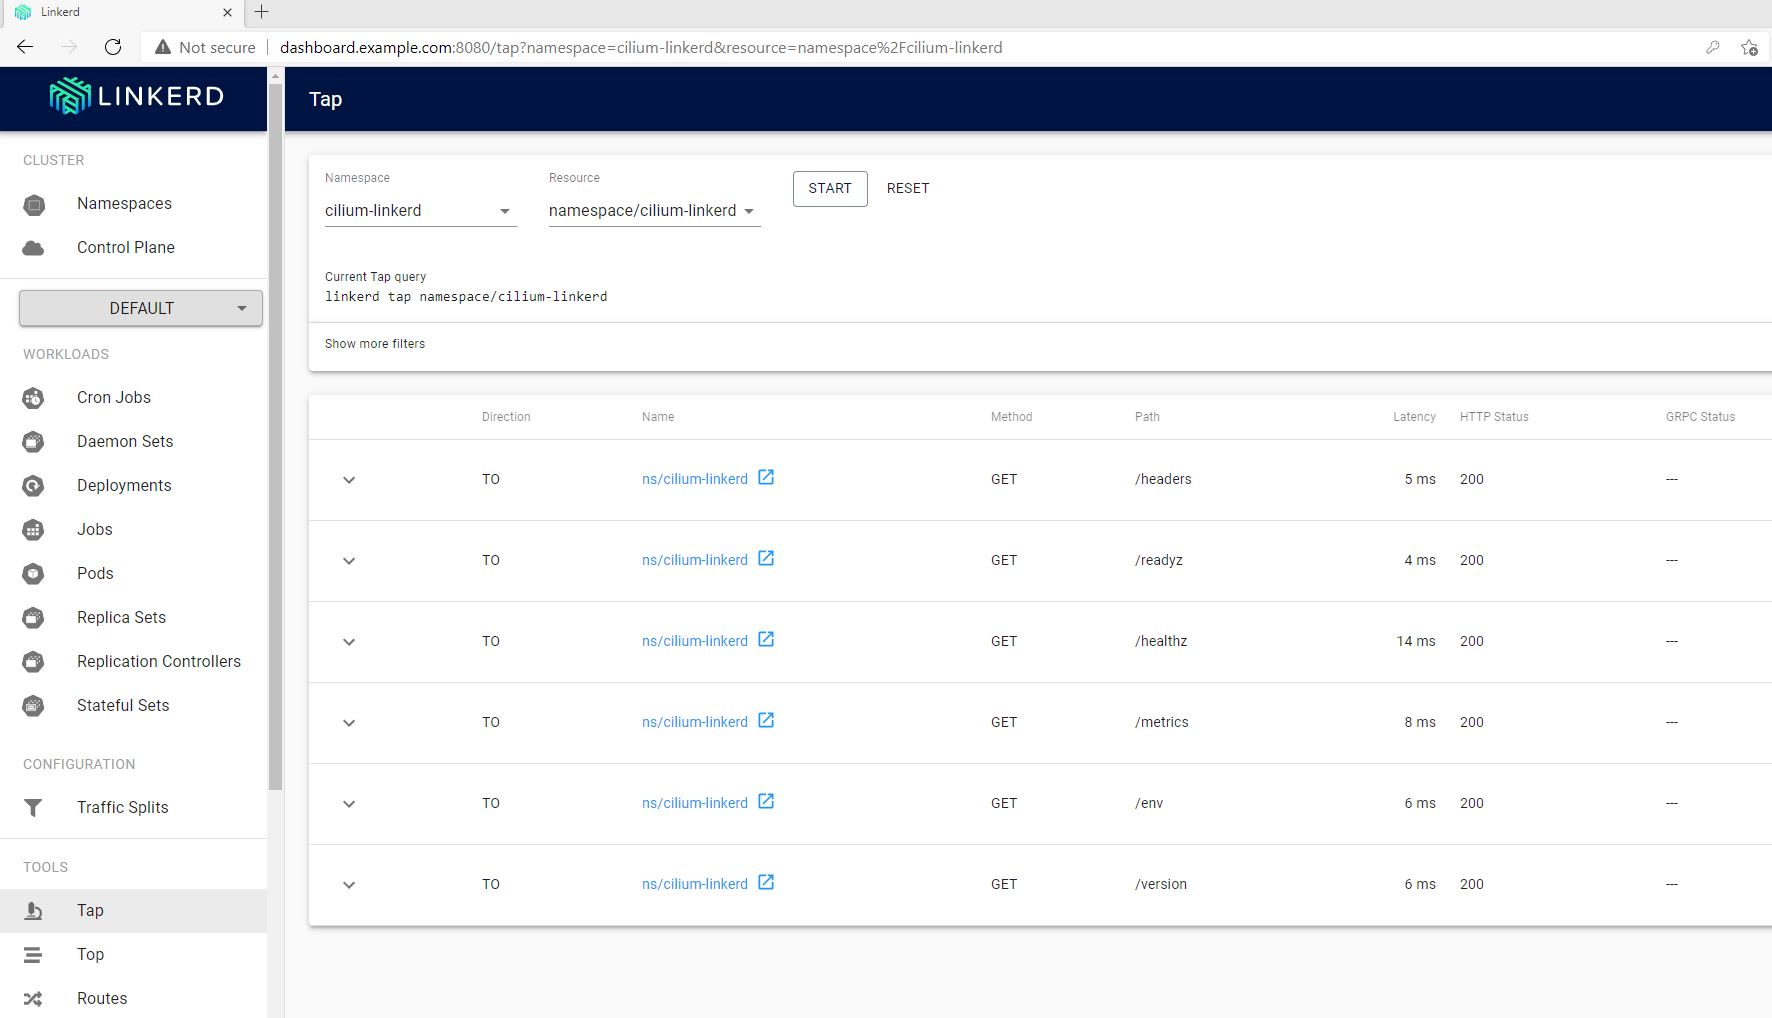
With that config we’ve exposed the Linkerd dashboard via dashboard.example.com:8080 address (The port number is 8080 instead of 80 because we’ve setup the load balancer on that port while we were creating our cluster with k3d: --port 8080:80@loadbalancer)
As we’ve setup Basic Authentication for accessing the dashboard (Secret resource in the nginx.yaml file), a username/pasword pair will be needed:
Username: admin
Password: admin
Here is the same information of the Tap tool we’ve seen on the CLI previously:
References
- https://buoyant.io/2020/12/23/kubernetes-network-policies-with-cilium-and-linkerd
- https://sandstorm.de/de/blog/post/running-cilium-in-k3s-and-k3d-lightweight-kubernetes-on-mac-os-for-development.html
- https://www.edvpfau.de/kubernetes-k3d-mit-cilium-und-hubble/
- https://docs.cilium.io/en/v1.9/gettingstarted/k3s/
- https://linkerd.io/2.10/getting-started/
- https://kubernetes.github.io/ingress-nginx/deploy/#using-helm
- https://linkerd.io/2.10/tasks/exposing-dashboard/