Introduction
There are a lot of tools for setting up a Kubernetes cluster on a local machine – e.g., k3d, minikube, kind, MicroK8s, etc.
All of these tools have their own limitations/quirks, so it is a matter of taste to use one of them, most of the time.
These days I’m using k3d on my own machine, because I find it quite useful as it provides a local Kubernetes environment with all the batteries included.
It is based on the k3s project of the Rancher Labs. Basically it is a thin-wrapper around the k3s. Hence, it has CNI plugin, load balancer, ingress controller, etc. built-in.
Prerequisites
- k3d is running on top of Docker, so Docker has to be installed before getting started with it.
- kubectl (Kubernetes CLI) is needed to interact with the clusters set up by k3d
Install k3d
k3d could be installed with this single command:
curl -s https://raw.githubusercontent.com/rancher/k3d/main/install.sh | bash
Or, alternatively, this command could be used where Homebrew exists on the local machine:
brew install k3d
This single binary k3d client is all we need to create our clusters, everything else will be handled by k3d on top of Docker.
Setup a Kubernetes cluster
This is the basic command to setup a Kubernetes cluster:
k3d cluster create
When this command is used, a single node cluster will be up and running in a short while.
By default, the name of the cluster will be set as k3s-default. If we want to give a specific name to our cluster, we can do that as follows:
k3d cluster create my-cluster
The new cluster will be setup with the name my-cluster:

This cluster will include two Docker images:
- A server image which acts as both control-plane and worker node
- A load balancer (LB) image (Klipper is used as the built-in LB)

Once the cluster is up and running, current-context of the default kubeconfig will be switched to our newly created cluster context:

From now on, we can work on our cluster as a regular Kubernetes environment by just using kubectl.
Customize the Kubernetes cluster
High-Availability
In order to have a high-available cluster environment, k3d could be instructed to setup multiple nodes:
k3d cluster create my-cluster \
    --servers 3 \
    --agents 3
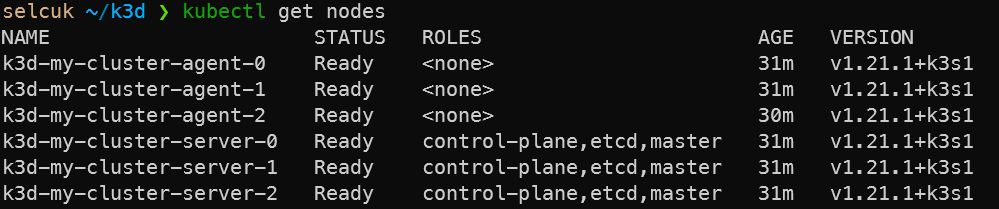
With this command 3 nodes for control-plane, and 3 nodes as the workers will be setup:

CNI plugin
By default, Flannel is used as the built-in CNI plugin. But other CNI plugins could be used as needed – e.g, for implementing Network Policies as Flannel does not support them.
Flannel could be disabled like this while setting up a new cluster:
k3d cluster create my-cluster \
    --k3s-server-arg "--flannel-backend=none"
Then, another CNI plugin like Calico could be enabled:
kubectl apply -f https://k3d.io/usage/guides/calico.yaml
Or, that calico.yaml file could be downloaded to the local machine, and following single command could be run instead of the previous two commands (as any file found in /var/lib/rancher/k3s/server/manifests directory will automatically be deployed to Kubernetes with Auto-Deploying Manifests feature of k3s):
k3d cluster create my-cluster --k3s-server-arg '--flannel-backend=none' \
    --volume "$(pwd)/calico.yaml:/var/lib/rancher/k3s/server/manifests/calico.yaml"
Ingress Controller
By default, Traefik is used as the built-in ingress controller. When another ingress controller is needed, Traefik could be disabled with this command during the cluster creation:
k3d cluster create my-cluster \
    --k3s-server-arg "--disable=traefik"
Then, for example ingress-nginx could be used as the ingress controller by using these commands:
# Add ingress-nginx helm repo
helm repo add ingress-nginx https://kubernetes.github.io/ingress-nginx
helm repo update

# Install ingress-nginx helm chart
helm install ingress-nginx ingress-nginx/ingress-nginx
Load Balancer (LB)
k3d cluster create my-cluster \
    --port 8080:80@loadbalancer
This command maps the port 8080 on the host machine to port 80 on the load balancer inside the cluster, as the built-in LB is listening on port 80 by default:

If we want to setup our cluster without a LB for whatever reason, we can do so as follows:
k3d cluster create my-cluster --no-lb
Use a Config File for customizations
k3d supports configuration files since the beginning of 2021 with the version 4.0.0 (#configfile). So all the customizations can be done via a configuration file as follows:
# my-cluster.yaml
apiVersion: k3d.io/v1alpha2
kind: Simple
name: my-cluster
servers: 3
agents: 3
volumes:
  - volume: /home/selcuk/k3d/calico.yaml:/var/lib/rancher/k3s/server/manifests/calico.yaml
    nodeFilters:
      - server[*]
      - agent[*]
ports:
  - port: 8080:80
    nodeFilters:
      - loadbalancer
options:
  k3s:
    extraServerArgs:
      - --flannel-backend=none
      - --no-deploy=traefik
And we can setup a cluster by using this sample config file like this:
k3d cluster create --config my-cluster.yaml
Stop/Start/Delete the Kubernetes cluster
Once we are done with our cluster, we can stop it:
k3d cluster stop my-cluster
We can start it again later on, and resume where we left off:
k3d cluster start my-cluster
And finally, this cluster could be completely destroyed when we are done with it:
k3d cluster delete my-cluster